Warning: Undefined variable $language in /home/xs807092/hikeout-design.com/public_html/wp/wp-content/themes/hikeout/functions.php on line 55
Warning: Undefined variable $language in /home/xs807092/hikeout-design.com/public_html/wp/wp-content/themes/hikeout/functions.php on line 55
Warning: Undefined variable $language in /home/xs807092/hikeout-design.com/public_html/wp/wp-content/themes/hikeout/functions.php on line 55
Warning: Undefined variable $language in /home/xs807092/hikeout-design.com/public_html/wp/wp-content/themes/hikeout/functions.php on line 55
Warning: Undefined variable $language in /home/xs807092/hikeout-design.com/public_html/wp/wp-content/themes/hikeout/functions.php on line 55
Warning: Undefined variable $language in /home/xs807092/hikeout-design.com/public_html/wp/wp-content/themes/hikeout/functions.php on line 55
Warning: Undefined variable $language in /home/xs807092/hikeout-design.com/public_html/wp/wp-content/themes/hikeout/functions.php on line 55
Warning: Undefined variable $language in /home/xs807092/hikeout-design.com/public_html/wp/wp-content/themes/hikeout/functions.php on line 55
Warning: Undefined variable $language in /home/xs807092/hikeout-design.com/public_html/wp/wp-content/themes/hikeout/functions.php on line 55
Warning: Undefined variable $language in /home/xs807092/hikeout-design.com/public_html/wp/wp-content/themes/hikeout/functions.php on line 55
Warning: Undefined variable $language in /home/xs807092/hikeout-design.com/public_html/wp/wp-content/themes/hikeout/functions.php on line 55
Warning: Undefined variable $language in /home/xs807092/hikeout-design.com/public_html/wp/wp-content/themes/hikeout/functions.php on line 55
Warning: Undefined variable $language in /home/xs807092/hikeout-design.com/public_html/wp/wp-content/themes/hikeout/functions.php on line 55
Warning: Undefined variable $language in /home/xs807092/hikeout-design.com/public_html/wp/wp-content/themes/hikeout/functions.php on line 55
Warning: Undefined variable $language in /home/xs807092/hikeout-design.com/public_html/wp/wp-content/themes/hikeout/functions.php on line 55
Warning: Undefined variable $language in /home/xs807092/hikeout-design.com/public_html/wp/wp-content/themes/hikeout/functions.php on line 55
Warning: Undefined variable $language in /home/xs807092/hikeout-design.com/public_html/wp/wp-content/themes/hikeout/functions.php on line 55
Warning: Undefined variable $language in /home/xs807092/hikeout-design.com/public_html/wp/wp-content/themes/hikeout/functions.php on line 55
Warning: Undefined variable $language in /home/xs807092/hikeout-design.com/public_html/wp/wp-content/themes/hikeout/functions.php on line 55
Warning: Undefined variable $language in /home/xs807092/hikeout-design.com/public_html/wp/wp-content/themes/hikeout/functions.php on line 55
Warning: Undefined variable $language in /home/xs807092/hikeout-design.com/public_html/wp/wp-content/themes/hikeout/functions.php on line 55
Warning: Undefined variable $language in /home/xs807092/hikeout-design.com/public_html/wp/wp-content/themes/hikeout/functions.php on line 55
Warning: Undefined variable $language in /home/xs807092/hikeout-design.com/public_html/wp/wp-content/themes/hikeout/functions.php on line 55
Warning: Undefined variable $language in /home/xs807092/hikeout-design.com/public_html/wp/wp-content/themes/hikeout/functions.php on line 55
概要
エックスサーバでLaravelテスト環境を構築し、githubでソースコード管理します。
開発の流れはこちら
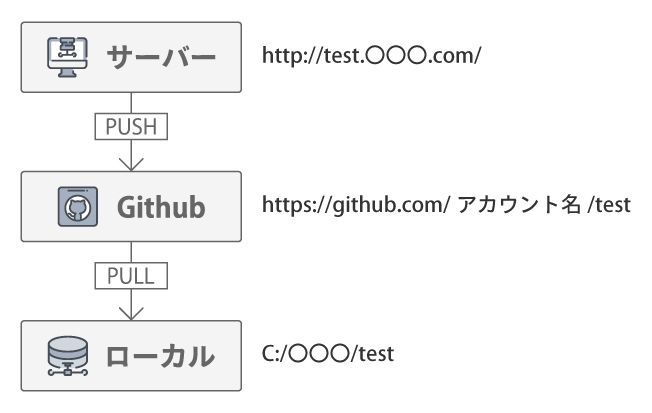
公開ドメイン「〇〇〇.com」にテスト環境としてサブドメイン「test.〇〇〇.com」を作り、そこでLaravel
の開発ができるようにします。
1.エックスサーバへSSH接続
エックスサーバの管理画面 TOP>SSH設定>公開鍵認証用の鍵ペア生成 で鍵を生成。
※エックスサーバのSSH設定はこちら
秘密鍵〇〇〇.keyはダウンロードされ、公開鍵はサーバのトップディレクトリに /.ssh/authorized_keys で設置されます
①ローカルのどこか適当な場所にsshのディレクトリを作ります
$ mkdir .ssh②移動
$ cd ~/.ssh③リネーム
$ mv 〇〇〇.key ~/.ssh/id_rsa④接続
$ ssh -l 〇〇〇 -p 10022 〇〇〇.xsrv.jpyes→パスフレーズ入力で完了
ローカルにknown_hostsというファイルが生成されます
2.SSH接続の簡略化
毎回接続のコマンドとパスフレーズを入力するのが面倒なので、簡略化の設定をする。
①SSH接続の再設定をするため、サーバ側とローカル側両方のファイルを削除する
サーバ側に入ったまま、以下を実行
・サーバ…authorized_keysを削除
・ローカル…id_rsaとknown_hostsを削除
②ssh-keygenで公開鍵と秘密鍵を作成する
$ cd ~/.sshで移動し、
$ ssh-keygenで作成する。
enter3回でOK。パスフレーズを求められるが、入力しないことでログイン時の入力を省けます。
③id_rsa.pubをauthorized_keysに変更
$ cat id_rsa.pub
$ ~/.ssh/authorized_keys
④パーミッションを変更
$ chmod 600 ~/.ssh/authorized_keys⑤秘密鍵の移動
id_rsaをローカル側にコピーします。
※FTPソフトでDLした。
⑥configファイルを設置する
Host login ←loginは好きな名前でOK
Hostname ←サーバ名または IP アドレス
User ←サーバ名
Port 10022
IdentityFile ~/.ssh/id_rsa
⑦【初回のみ】ssh接続
exitでサーバの接続を切り、再度ssh接続します。
ssh loginで接続すると、「Are you sure you want to continue connecting (yes/no/[fingerprint])? yes」と聞かれるのでyesと入力して接続。
2回目以降はssh loginで接続できます。
3.インストールor最新版アップデート
・phpのバージョンアップ
・composerのアップデート
・gitとgettextをインストール
4.FTPソフト(FileZilla)をSSH接続する
メニューから編集>設定に移動し、ページの選択>SFTPから公開鍵認証の設定をする。
①鍵ファイルの追加を押し、秘密鍵を置いたディレクトリに移動し、秘密鍵を選択して開きます。
※リネームしている場合はパスフレーズを入力して進み、.ppkの拡張子で秘密鍵を作成しOKボタンを押します。
②サイトマネージャーから新しいサイトを追加し、設定して接続すればOK。
プロトコル:SFTPで
ホスト:サーバーID.xsrv.jp
ポート:10022
ユーザー:サーバーID
パスワード:設定したパスフレーズ
5.atomでのSSH接続
パッケージ「Remote-FTP」をインストールし、任意の場所に.ftpconfigを設置
{
    "protocol": "sftp",
    "host": "サーバID.xserver.jp",
    "port": 10022,
    "user": "ユーザー名",
    "pass": "パスワード",
    "promptForPass": false,
    "remote": "/home/~/〇〇〇.com/public_html/test",
    "local": "",
    "agent": "",
    "privatekey": "C:/Users/〇〇〇/.ssh/id_rsa",
    "passphrase": "パスフレーズ",
    "hosthash": "",
    "ignorehost": true,
    "connTimeout": 10000,
    "keepalive": 10000,
    "keyboardInteractive": false,
    "keyboardInteractiveForPass": false,
    "remoteCommand": "",
    "remoteShell": "",
    "watch": [],
    "watchTimeout": 500
}
※host、user、pass、remote、privatekey、passphraseを適宜変更
プロジェクトフォルダを.ftpconfigの設置場所に追加。
メニューのパッケージ>Remote-FTP>connectで接続。
6.Githubの設定
①リポジトリの作成
githubにログインし(アカウント無ければ作る)、新規リポジトリを作成します。
②公開鍵をgithubに登録
リポジトリを作成したら、setting>Deploy keysのページからAdd deploy keysで公開鍵を登録します。
タイトルは適当でOK。Keyにid_rsa.pubファイルに記載してある内容をコピペします。
※「Allow write access」にチェック。無いとサーバからのpush時にエラー
③パーミッションの変更
$ chmod 600 ~/.ssh/id_rsa
$ chmod 644 ~/.ssh/id_rsa.pub
④接続確認
サーバで以下を打ち
$ ssh -T git@github.com「Hi xxxx! You’ve successfully ~~」が帰ってくればOK
⑤テスト環境にリポジトリを設置
$ git clone git@github.com:〇〇〇〇〇/test.git7.Githubにpushで自動デプロイ(やらなくてもOK)
Githubのwebhookを使用します。
deploy.phpファイルを作成。中身は以下のコード。
<?php

// 設定
$LOG_FILE = dirname(__FILE__).'/deploy.log';
$SECRET_KEY = '〇〇〇';//githubのwebhookでSecretに設定した内容

if (!function_exists('getallheaders'))
{
    function getallheaders()
    {
           $headers = [];
       foreach ($_SERVER as $name => $value)
       {
           if (substr($name, 0, 5) == 'HTTP_')
           {
               $headers[str_replace(' ', '-', ucwords(strtolower(str_replace('_', ' ', substr($name, 5)))))] = $value;
           }
       }
       return $headers;
    }
}

$header = getallheaders();
$hmac = hash_hmac('sha1', file_get_contents("php://input"), $SECRET_KEY);
if ( isset($header['X-Hub-Signature']) && $header['X-Hub-Signature'] === 'sha1='.$hmac ) {
    $payload = json_decode(file_get_contents("php://input"), true);
    exec('cd /〇〇〇/〇〇〇/〇〇〇.com/public_html/test ; git pull');//git pullするディレクトリ
    file_put_contents($LOG_FILE, date("[Y-m-d H:i:s]")." ".$_SERVER['REMOTE_ADDR']." git pulled: ".$payload['after']." ".$payload['commits'][0]['message']."\n", FILE_APPEND|LOCK_EX);
} else {
    file_put_contents($LOG_FILE, date("[Y-m-d H:i:s]")." invalid access: ".$_SERVER['REMOTE_ADDR']."\n", FILE_APPEND|LOCK_EX);
}

?>
webhookの設定
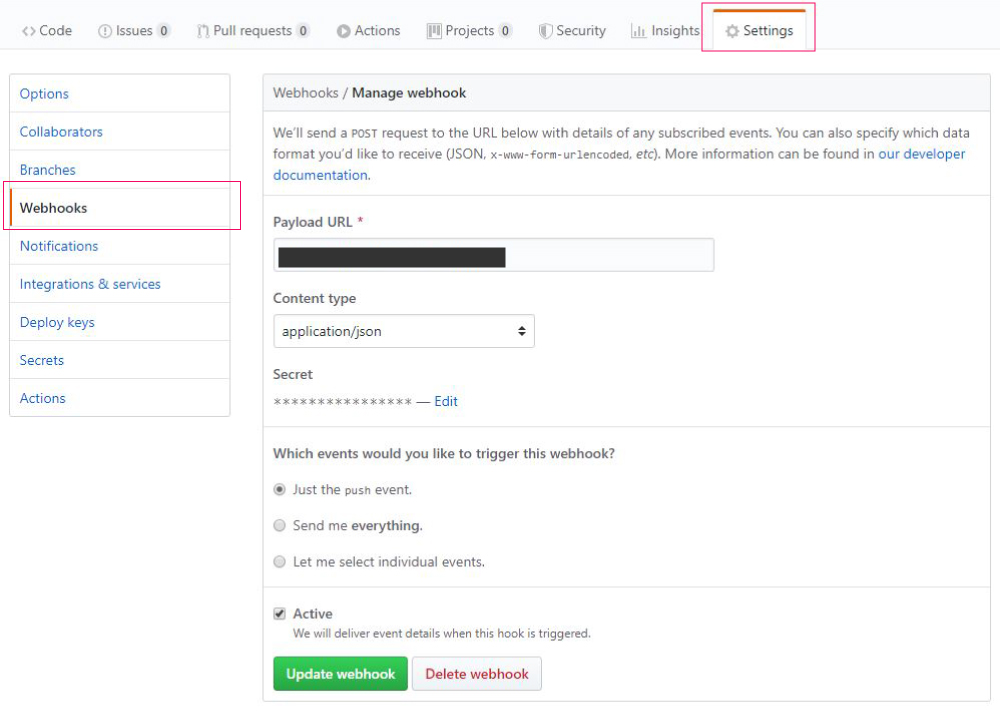
Payload URL→deploy.phを設置したURL
Content type→application/json にしました
Secret→適当なパスワード。deploy.phpの$SECRET_KEYに設定
Which events would you like to trigger this webhook?→push
Active→チェックつけたまま。
※Recent Deliveriesでpush後hookが動いているか確認できます。
ローカルからgithubにpushすれば、テスト環境へ自動デプロイされます。
外から見れると良くないので、basic認証をかけます。
※空白あるのでこのままコピペだと動かない
8.サーバーからgithubへpush
対象ディレクトリに行き、ファイルを更新。
$ git remote add origin git@github.com:〇〇〇〇〇/test.gitgit addすると以下のエラー
fatal: remote origin already exists.originを削除
$ git remote rm origin再度addしcommit
$ git commit -m "適当なメッセージ"を打って
On branch master
Changes not staged for commit:~
と出てきたら
$ git add .その後
$ git push -u origin masterでOK
※慣れるまではgit commitを行うまでにどのコマンドを使うか分からないので、git statusを使う。
commitまでに必要な動作が一通り記載されています。
※2回目以降は以下の流れで大体OK
git add .
↓
git commit -m “適当なメッセージ”
↓
git push
8.Laravelのインストール
以下コマンドを打って
$ composer create-project laravel/laravel test下記URLにアクセスできるようになります。
http://ドメイン名/test/public/
ドメイントップで公開したいので、作成したLaravelディレクトリ直下に.htaccessを以下の内容で作成
RewriteEngine On
RewriteRule ^(.*)$ プロジェクト名(サブドメインの場合はサブドメインURL)/public/$1 [QSA,L]
Laravelの画面が出れば完了です。
9.Githubのリモートリポジトリへpushするときに出てきたwarning
$ git add .で以下のメッセージ。
warning: CRLF will be replaced by LF in .htaccess.
The file will have its original line endings in your working directory
チェックアウト時にLF→CRLFに変換されるようです。
そのままcommitしてpush